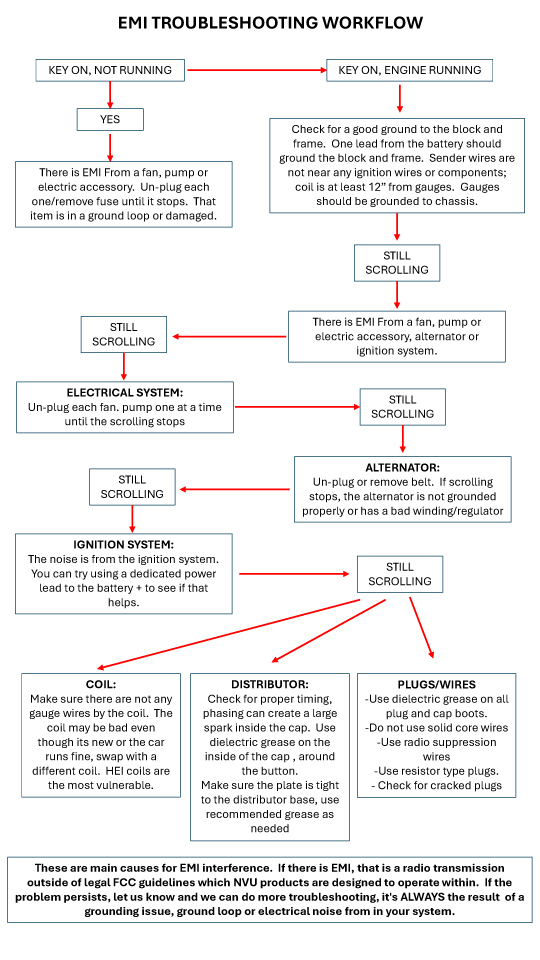
EMI TROUBLESHOOTING WORKFLOW AT BOTTOM OF THIS PAGE
When it comes to the EMI/RF Interference there are many causes and only a few remedies you can apply to eliminate the issue.
This is a widespread issue across the industry as more and more electronics are being installed as well as more lower-quality imported parts are being used.
EVERY manufacturer has some sort of article on the subject as well.
You can also check out this SPEEDWAY MOTORS ARTICE HERE Its really good.
READ THIS FIRST:
These are customer testimonials in regards to the ways they have fixed their own vehicles EMI/RF noise issue. If you are having similar issues inspect these components first!
I noticed I had run some of the signal wiring near my aftermarket alternator, as soon as I rerouted those wires away from the alternator Walah! it works!!! thanks soo much to Bob and Vince!
Disregard my last message, I took your advice and moved my remote mount coil abount a foot away from where it was mounted on the firewall and that did it! I was able to calibrate the gauge, Thanks so much for your insite! please pass my info along to other guys with a remote coil!
I'm back. I separated the temp and oil press wires from everything else. Then I ran the engine and when it warmed up, the display started a slow scroll. I disconnected the temp wire from the sending unit and the scrolling stop. The wire was running along the valve cover parallel to the alternator wires and under the spark plug wires. Moved them and its Disappeared! Thanks for the help!!


We are going to cover why EMI/RF interference is present and how it can negatively impact the operation of sensitive aftermarket electronics from ECUs to your very own NVU Speedometer or Tachometer. Good News we have the solution to this headache!
The fact that vehicles generate EMI has been known since the advent of AM radio in the 1930's, when noise generated by the engine was readily detectable by the automobile radio.
The internal combustion engine generates a large amount of electromagnetic interference. The engine utilizes a high voltage ignition system to ignite the fuel. The ignition system produces short impulses that generate a broad spectrum of frequencies. Other sources of EMI located within vehicles include motors that are used for blowers, windshield wipers, buzzers used for ignition and seat belt warnings, and voltage regulators that utilize points that open and close frequently. All of these devices generate interference in a frequency spectrum from the kilohertz range up to the gigahertz range.
This EMI or radio frequency interference, RFI as it is sometimes called can arise in a number of ways, although in an ideal world it should not be present. Automotive manufacturers utilize several techniques to reduce EMI emanating from the vehicle. The techniques include resistor spark plugs, resistor spark plug cables, use of silicone lubricant in the distributor, use of capacitors as filters, placement of grounding straps at key locations.
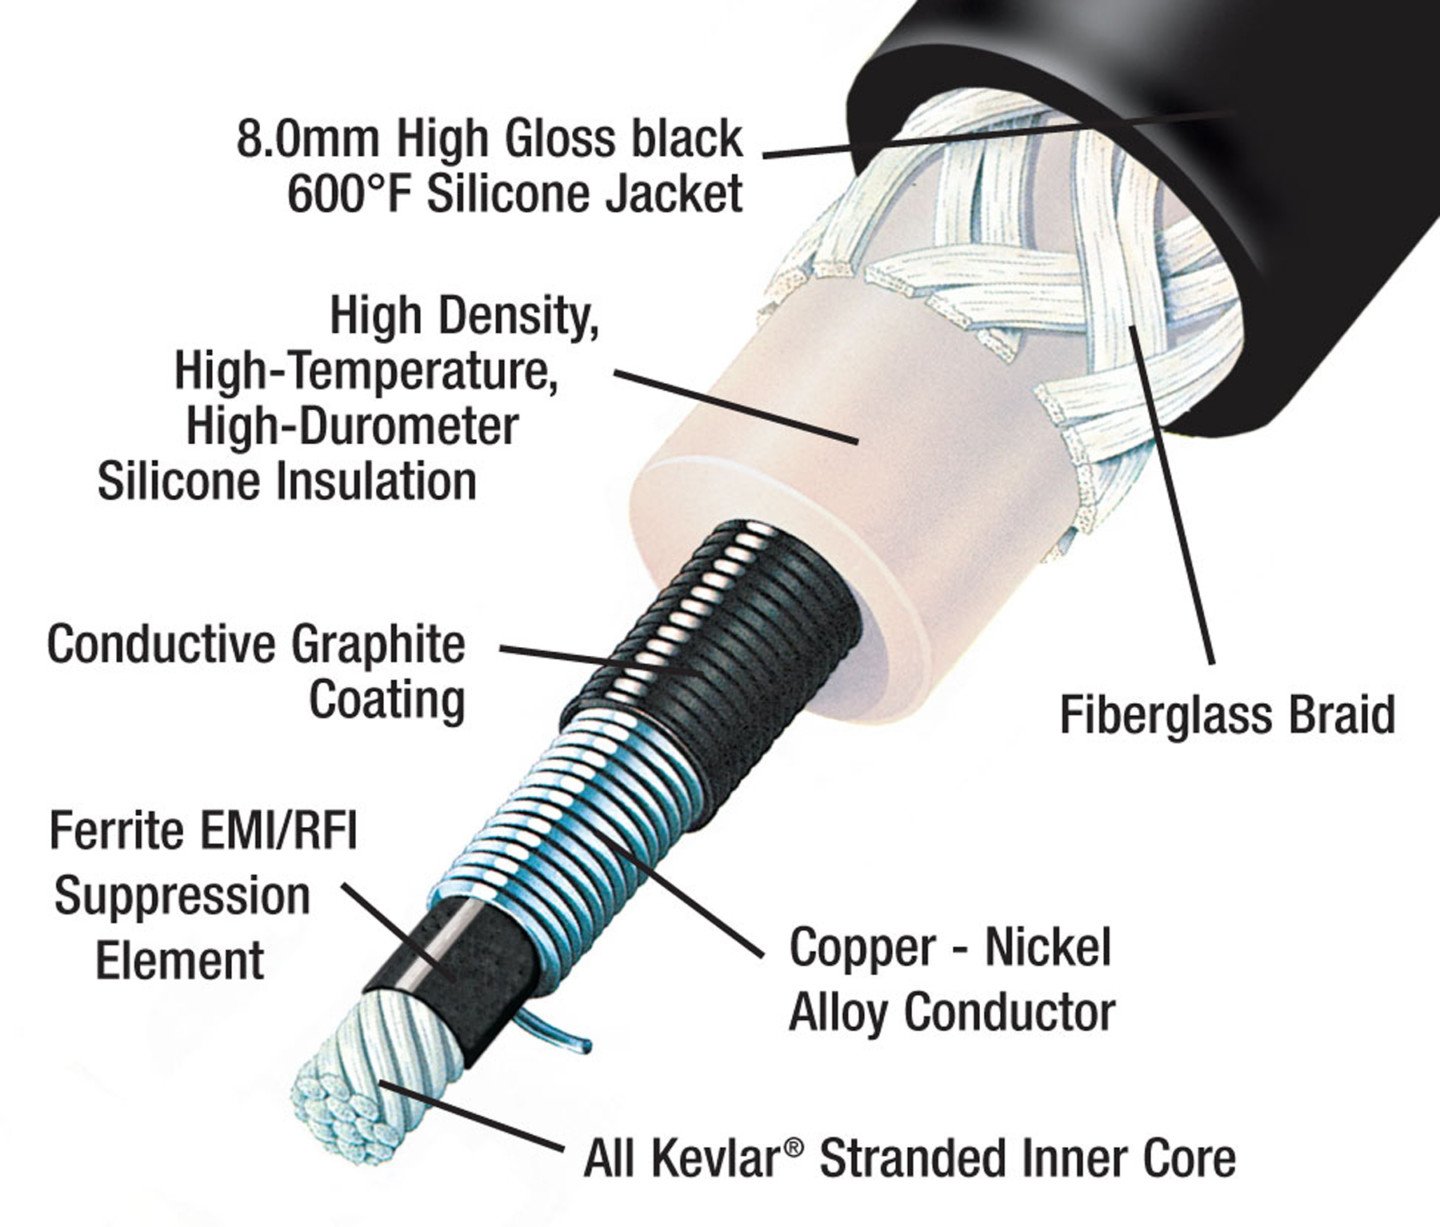
Conducted Interference
EMI including radio frequency interference radiates or conducts undesirable voltages into victim circuits. Radiated interference is that which is transmitted by electromagnetic fields and received by the antenna effect of other equipment. Conducted interference is interference that is introduced into a circuit by coupling. Coupling can be either resistive, capacitive, or inductive. Conductive interference exists most often where common return circuits such as power supplies and grounds exist.
Conducted interference can be identified by temporarily operating the affected equipment (victim) from a separate power supply. If the interference stops then it is conducted. If the interference remains then it is radiated.
Easily identify arcing under the hood ( NO TOOLS REQUIRED)
- Get your vehicle somewhere free of any light, or at night if possible.
- Now Crank the engine and look under the hood, if you see a lightning storm these a good chance you located the issue. (Tip: Second set of eyes can be helpful)
The problem is that even the best wires don't last forever and all it takes is a crack in the insulation at a key point to create arcing, That arcing will result in EMI.
*If you don't see any lightning under the hood, you might use a non conductive rod/stick to move the spark plug and coil wires, just to be sure the problem is not an intermittent one caused by the motion of the vehicle or under hood air flow.
Dielectric Grease:
That little packet is always vying for our attention at every auto parts checkout! What the packet lacks in size it makes up for in big EMI reduction!
Simply apply a dab of Dielectric Grease to your connectors of your ignition system components. This includes connectors as well as inside the HEI Cap as well, coat the rubber insulator under the coil to reduce the radiated EMI by as much as 5-10MHZ. Applying small amounts can have big results when it comes to a solution for an erratic Gauge display. If the problem still exists you have an underlying issues that needs to be corrected. See below
Distributor Inspection

Arcing from the cap, wire connections, distributor cap retainer and connector terminals. Cracks in the cap will be evident at the top spark plug wire poles, where the pole necks have the least material insulation. Look for blue-white bolts of electricity jumping from pole to pole or from the bottom of the cap to engine ground. Electrical arcing will be accompanied by an audible "clicking" or "snapping" noise.
You might also notice the inside of the cap is damaged by the arcing, causing the contacts to burn off (a lot of carbon tracing can be seen inside) In this case we would recommend going over the Cap, Coil, Module and replacing the damaged parts causing the issue immediately.
MSD has this great video that shows exactly what happens:
COIL:
Customer's email after replacing coil on new ready to run HEI application.
"After sending you the last email, I swapped the coil out on this new HEI I bought with a different old coil that I have in my goodie stash. It appears that the coil for some reason was the issue. The scrolling has stopped since replacing the coil!
Alternator/Voltage Regulator
Before computers and networks in vehicles, an alternator that was producing AC voltage or ripple through the electrical system would cause flickering lights and maybe an ignition problem. Today, excessive ripple voltage can cause communication issues with networks and communication DTCs in multiple modules.
Computer modules and sensors are all part of the system that requires the charging system to supply direct current to a relatively stable DC voltage level, but the alternator converts mechanical energy by using electromagnetic induction that generates alternating, or AC, current. Inside the alternator, the AC current is turned into DC current using a rectifier.
The rectifier has between three and eight diodes that allow the negative current of the AC sine wave to pass to ground. This cleans up the current, leaving DC current and a very small amount of AC current that is typically absorbed by the battery. When a diode fails, the amount of DC current drops and, in some cases, the AC current makes its way into the vehicle’s power supply.
TEST:
On a scope with the correct filter or leads, ripple voltage looks at the alternating current from a diode. A typical diode failure will show an asymmetric wave instead of a stable waveform. A multimeter can read AC voltage and can be used to test for ripple. The alternator should be replaced if AC voltage of more than 50mV is detected (in some cars as much as 100mV is acceptable). A dead or weak battery can throw off a ripple test, however, so you must make sure the battery is fully charged. Voltage regulators are often responsible for low frequency, visible and rhythmic voltage ripple due to things like worn brushes.
Set the DMM to read AC volts and measure the battery while the engine is properly warmed up and idling at approximately 1,500 rpm, which will put some load on the electrical system with the headlights and blower turned on. If there is more than 0.1 volt (50-100mV, depending on the vehicle) of AC ripple, then the alternator is most likely bad. Be sure that the meter you are using blocks DC voltage while in the AC mode. Check the battery voltage with the engine is not running and see if the meter reads voltage while in the AC mode. It should not show any voltage if the DC is blocked.
Typical current draw should be less than 40 milliamps, depending on the accessories installed in the car. Things like alarm systems will cause extra current draw. If there’s a parasitic loss on the charging system, the number could be higher.
A ripple test showed that the alternator should be replaced. The new alternator had a ripple test reading of 55mV, which was acceptable. The replacement alternator put out 13.9V without a load, and 13.6V loaded. All of the previous alternator tests showed around 12V loaded or not loaded. Therefore, the vehicle was running too close to drain the battery under load. With the higher voltage output after the alternator replacement and good ripple, it was indeed another case of a ghost in the machine.
Modern Ripple Diagnostics
In older vehicles, a bad diode would set off a light on the dash, but with today’s modern cars with sensors, modules and networks, stray AC voltage can cause a wide variety of problems. Unlike your scope or multimeter, the electrical system can’t tell the difference between AC and DC current. If the ripple voltage exceeds certain levels, it can interfere with a three- or five-volt CAN bus line.
Networks in a vehicle communicate by switching DC voltage on and off quickly at precise intervals. If you look at an AC voltage sine wave, it is alternating between positive and negative volts. If stray AC voltage is in the line, the alternating voltage looks a lot like the switch of a network signal to a module. When the module decodes the signal, it is gibberish. This can cause communication codes in multiple modules. Stray AC voltage can also interfere with engine position sensors and even actuators that are pulse-width modulated.
The toughest part of diagnosing these problems is that when the vehicle is sitting in the bay, you might be scanning with only the battery or when the vehicle is at idle. It is not until the engine is running above 1,500 rpm that the AC voltage starts to be generated by the alternator.(Source: www.autosuccessonline.com)
Spark Plug Wire Info & Testing

Spark plug wires deliver thousands of volts – up to 45.000V, depending on the application – to the spark plugs. To do this successfully, they need to be covered in thick insulation to prevent high voltages jumping off the wire before it reaches the spark plug and a rubber boot at each end. The boot protects the metal connectors from moisture, corrosion, oil and other contaminants.
Failing spark plug wires can cause:
- Engine misfiring,
- Increased fuel consumption,
- Lack of power,
- Stalling,
- Rough idle,
- Fuel system problems, such as fuel in the cylinder,
- Problems starting your car,
- An engine warning light to illuminate,
- Possible malfunction of onboard electronics such as Radio and GPS.
Before you start to test your spark plug wires, ensure you have the following tools:
- Jumper wire (30-60cm long)
- Spark plug wire pliers (if available)
- Clean cloth
- Tape measure
- multimeter or ohm meter
- Owners’ manual for your car
- Rubber mat
For these tests, it’s important to test each wire separately. In other words, disconnect one wire, perform the test, reconnect it and continuing to the next wire. When reconnecting the wire, make sure it is not too close to other electronics or to anything hot, like the exhaust. By doing this wire by wire, each wire will be reconnected to its corresponding cylinder, ensuring the firing order of the ignition system is correct so the engine will continue to run.
1. Inspect the wires and clips
In a well-lit area, remove and visually inspect the spark plug wires one at a time. Clean each wire with a cloth and then look for physical damage like cuts and scorch marks on the wires or boots, carefully examine the insulation around the wire and look for corrosion between the boot (the end of the spark plug wire), the spark plug and coil. If you can’t see any physical damage, check the spring clips that hold the wires in the distributor cap. Damaged clips may allow wires to slip and not remain in the correct position. If everything looks okay, put the wire back and move onto the next one.
2. Run the engine
Turn the engine on and look for electrical arcs around the wires or listen for a snapping noise that might show a high-voltage electrical leak. Be careful not to touch the wires while the engine is running due to the risk of electric shocks from the high voltage.
3. Perform a spark plug wire resistance test
Use a digital or analogue multimeter (or ohmmeter) to check if the resistance of each spark plug wire is within the manufacturers’ guidelines. Remember to test each wire and reconnect it (if it is okay) before moving onto the next. To do this, set the multimeter to the appropriate scale and measure the wire by placing the probes on each end of the wire lead, making sure they touch the metal contacts. If the reading is within the manufacturers’ guidelines, the wire can be returned to the car before you start to test the next wire. Any defective wires should be replaced. If two or more wires are found to be defective, it's recommended to replace all wires with a set of new wires.
4. Check your spark plug wires are routed correctly
Consult your owners’ manual to see if your spark plug wires are routed properly. This is important as cross coupling can create an energy drain, which will lower performance. It is important to route the spark plug wires so that they do not come in direct contact with engine hot part such as exhaust manifold. Prolonged contact with engine hot parts could result in development of cracks in the insulation layer of spark plug wires.
REMEDY: Reducing the EMI!
Emi/Rf Interference can cause headaches and issues across your build, affecting your engines computers and even your brand new New Vintage Gauge kit.
We are going to go over a couple simple ways to reduce or eliminate the noise being created across the power and ground signals.
Be sure to check the coil as this is acting as a transformer to produce the high power!
Ferrite Beads
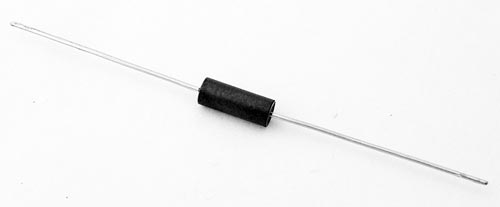
Ferrite beads prevent electromagnetic interference (EMI) in two directions: from a device or to a device
Ferrite beads are used as a passive low-pass filter, by dissipating RF energy to heat, by design.
The geometry and electromagnetic properties of coiled wire over the ferrite bead result in an impedance for high-frequency signals, attenuating high-frequency EMI/RFI electronic noise. The energy is either reflected back up the cable, or dissipated as low-level heat. Only in extreme cases is the heat noticeable.
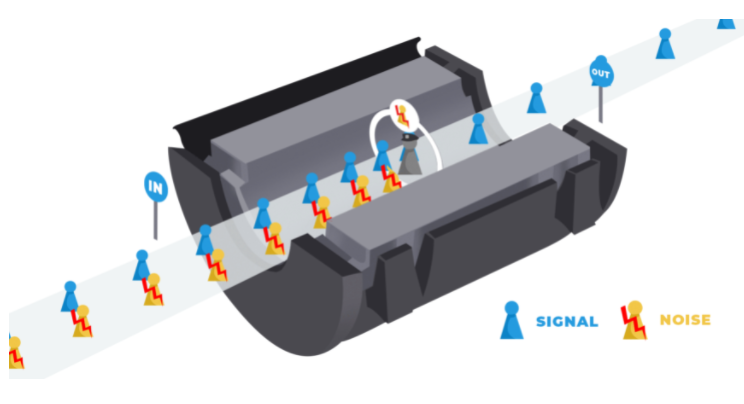
To eliminate and reduce EMI/RFI noise you can add a ferrite bead to your wiring harness as shown
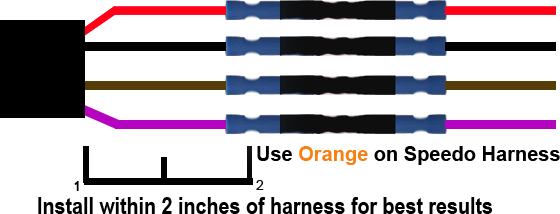
If you are experiencing a scrolling display on your gauge please contact NVU Tech Dept. at Service@newvintageusa.com.
We have a premade kit to remedy this issue caused by EMI interference which can be sent out at no charge!
