

2" DIRECT DRIVE GAUGES INSTALLATION AND TROUBLESHOOTING
NVU TECH DEPT. on 20th Mar 2025
Our Direct-drive gauge platform makes wiring as easy as it gets by reducing wiring by 75%. It may not be what you're used to from "the good old days" but once you dig in, you'll see the benefits right away.
The one thing that users have a hard time wrapping their heads around on these is that the 2" gauges (fuel, temp, oil, volts) are driven by the speedo and tach. the 2" gauges are just a blank gauge with a stepper motor and lights: It has no actual gauge function whatsoever; this is all accomplished by the driver gauge.
PLUGGING IN:
This is as easy as it gets, just plug into the appropriate port:
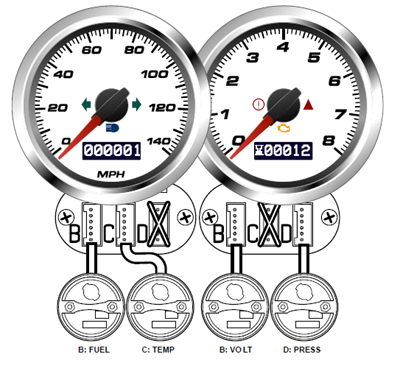
All 5 and 6-guage kits with OLED screens are plugged in the exact same way across the product line. You'll also notice that the sender/function wire is on the same gauge that the 2" gauge is plugged into. (Green fuel sender wire on speedo, fuel gauge plugs into speedo). The plugs and wiring are not interchangeable on the speedo and tach (you can't plug the volt gauge into the speedo for example, it will think its something else)
SPEEDO:
FUEL: B PORT
WATER TEMP: C PORT
NOT USED: D PORT: This means it not used
TACH:
VOLTS: B PORT
OIL PRESS: D PORT
C PORT: NOT USED
WATER TEMPERATURE AND OIL PRESSURE SENDERS:
All these needs are the senders. You must use the NVU senders, or the gauges will not operate properly.
Locations, thread sizes and such differ by engine type. We have an excellent ARTICLE RIGHT HERE that shows sender installations on most popular engines.
VOLTS AND FUEL
VOLTS is internally monitored, and no additional wiring is required.
FUEL LEVEL is read from your fuel sender in the fuel tank. Our Phoenix Platform gauges have fully programmable, dampened fuel gauges that can work on just about any tank/sender. We have a comprehensive article on how to use, set-up and test fuel senders and gauges RIGHT HERE>>>>
AFTER-INSTALLATION:
After installation, in the rare event you have any issues, don't worry we're here to help. We've seen it all over the past 20 years, don't worry you're not the only one that something may have gone awry!
Troubleshooting the 2" gauges covers a few different segments of the gauge installation:
1. The 2" gauge/harness/jumper boards
2. The driver gauge inputs
3. The senders
The first section, the gauge itself and associated harness/jumper plugs can be figured out using this simple video, once we know what's going on, we will be more than happy to get you up and running. Most importantly, we need this information to properly diagnose the issue to get you fully operational in the least amount of time.
To troubleshoot the gauge inputs on the driver gauges and/or the senders we have some excellent information on our Online troubleshooting page. It's great for afterhours wrenching or to just get going.
On that page you will also find our fully interactive downloadable PDF. You can download it and use at your leisure, at your own pace out in the barn where the reception might not be so good. It's the same process we use every day; step-by-step, push the button process. You can DOWNLOAD IT RIGHT HERE>>>
Of course you can always CONTACT US. We've seen it all a hundred times, so we are confident that you'll be up and running in no time!