

FUEL GAUGES AND SENDERS
NVU TECH DEPT. on 4th Mar 2025
FUEL GAUGES AND SENDERS
NVU Phoenix, Direct-drive and A90 gauges all feature fully programmable inputs that will operate on virtually any fuel sender OE or aftermarket! These platforms in addition to program-ability also incorporate electronic dampening to eliminate the bouncing pointer caused by fuel slosh. In this article we will discuss how to install the fuel sender and gauge as well as troubleshooting.
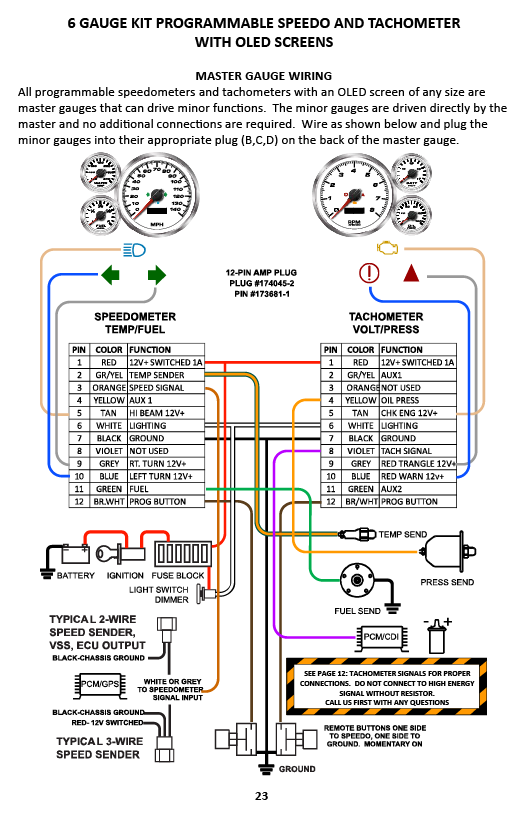
Installation of the gauge: Simply follow your instruction booklet, each page has a diagram and an image of which kit layout you have. ALL fuel gauges are connected to the GREEN wire on our kits. see below for general connections. Basically, the wire and DIP-Switch are on the same unit as the one that drives the fuel gauge:
DIRECT DRIVE KITS (4,5,6-GAUGE KITS): Fuel signal is on the GREEN wire and the DIP-switch is on the SPEEDOMETER
QUAD GAUGE KITS: Fuel signal is on the GREEN wire and the DIP-switch is on the QUAD GAUGE
3-1 KITS: Fuel signal is on the GREEN wire and the DIP-switch is on the TACHOMETER.
DUAL (3-GAUGE) KITS: Fuel signal is on the GREEN wire and the DIP-switch is on the FUEL/TEMP
Below is an example of a wiring page:
How do I know which setting to use?
If you ordered a Direct-fit kit, your fuel gauge should be pre-set with the correct setting for the stock sender. If you have a different tank or sender in the vehicle, the DIP-switch settings may need to be changed.
If you ordered a universal kit, the DIP-Switch settings for the fuel level are pre-set to 0-90Ω. You will have to find out what your tank/sender is set-up for and adjust the DIP-switches as required.
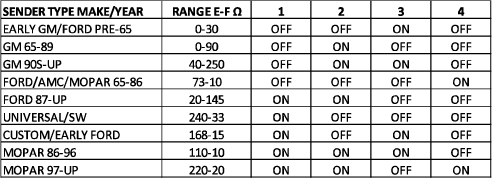
Making sure your gauge and sender share the same Ohm range is the single most important part of having your Fuel Gauge reading correctly! The range will vary from sender to sender and OEs use a different range for each make. Below is a chart of various fuel sender ranges used by different manufacturers.
How do I adjust the DIP-switches?
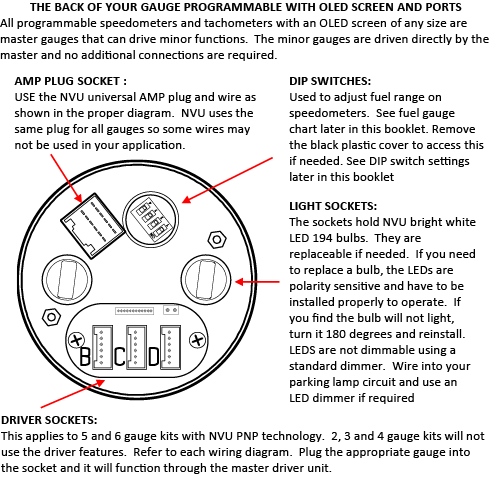
It's easy, simply power down the gauges, access the black cover on the above listed gauge and change the DIP-Sitches. Below is an image of the cover location.
NOTE:
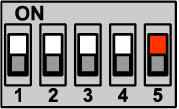
1. Look closely at the numbers on the DIP-switches to see the orientation. Depending on the gauge, the switch may not be oriented right-side up.
2. the 5th DIP switch has no effect on the fuel gauge, DO NOT MOVE THIS 5th switch.
This is a quick video showing the DIP-switch process:
How do I figure out which fuel sender I have?
The best thing to do is use an OE sender range for your vehicle. Then, in the event you forget or lose the paperwork, you know it matches that build. In the event that information is not available, you can do some quick tests, here is a really good video on the subject:
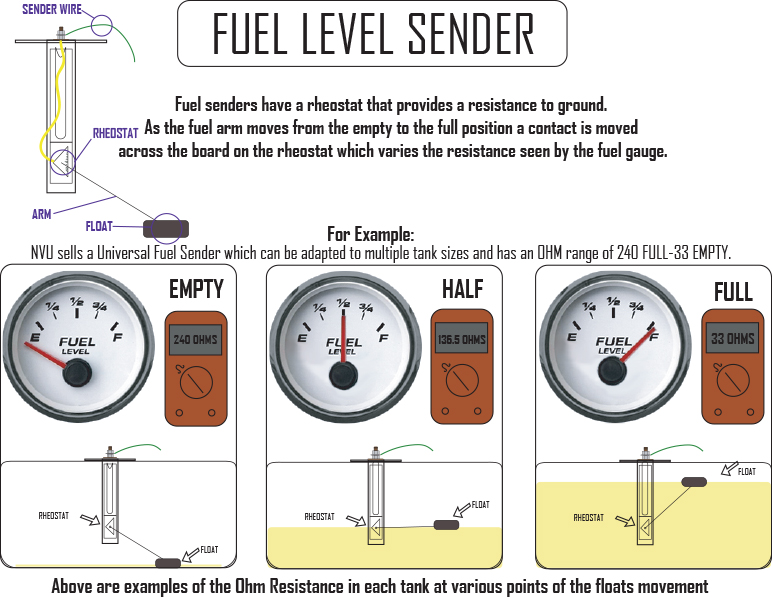
To help clarify things, we also have this really great image to help visualize the process:
Ok what the heck I still can't this figured out.
No problem, we've been doing this for a long time we have seen it all. troubleshooting the gauge and sender isn't difficult, just takes a little time and following along with our step-by step instructions. In the following section you will:
- Power up the gauges, they should all do a full sweep and return to zero before going to the sender inputs.
- Check that the Guage is operating in the proper range by checking the DIP-switches
- Check that the gauge is operating in the proper range by grounding the sender wire
- Check the resistance (ohms, Ω) of the sender to verify the range and that the sender is operating properly.
During these checks, you will learn that there are 3 parts of the system, any of which may be the culprit, our troubleshooting system is the fastest, most accurate way to find out the issue and get you up and running quickly.:
1. The gauge itself
2. The sender wire
3. The sender
OK I'm ready to figure this out what's next?
All you need to do is CLICK ON THIS LINK HERE and download our interactive PDF, you click on the issue, and it walks you through step-by step the process. At the end you will have the exact answer to the issue you are experiencing, works over 95% of the item. AND you can do it at your own pace, no phone pr email tag. this is the exact process we use every day for over 20 years.
You can also check out our complete online troubleshooting page with even more info, including the link to our interactive guide RIGHT HERE
Let us know what you found, and we can definitely help you get this thing up and running! Just reach out to us on our contact page here!